
Mystery Blocks Tutorial: Sewing Up Part 2
Good morning 🙂
Well, I am glad to be back in Blogland! Even though I have only recently started blogging, I have missed posting these last two days. Of course, the excuse would be that I was really busy…organising my daughter’s 13th birthday party :), of which I will post some pics tomorrow. We all had a fantastic day, and I know that it will be remembered as a special time with family and friends…
I am sure that you are anxious to see the next installment of the Mystery Toy… (I tend to assume a lot 😉 ), so here it is…
Mystery Blocks Tutorial: Sewing Up, Part 2
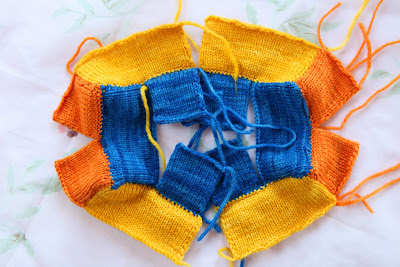
Ok, when we left off last time, you had what you see below. The toy is still in two pieces, which are mirror images of each other. We will slowly add more and more bits, and although it may seem confusing as to the final product…keep going, it will be a fun-to-play-with-toy (promise!)…
 Step 1. Place your work as seen above. This will orientate you with the steps to come…

Step 2. Find your dark green rectangles equivalent. Making sure that you place the knit side down, put them over the blue rectangle as above. Note that only half of the dark green rectangles will line up with the blue rectangle underneath. You will only sew up the two abutting edges (ie half of the dark green rectangles will be flapping free…)

Step 3. Sew up the seam, using the same oversewing technique as before. I have indicated the edges to be sewn up by a turquoise outline (just to be sure things are clear 🙂 )

Step 4. Flip the free edges of the dark green rectangles towards the middle, so that you see the knit side (look on the left side of the pic above) You will sew up the edges indicated by a pink line (dark green rectangle), to the edges indicated by the turquoise line (on the blue squares).
Repeat on the other side….
 Step 5. The seams are done…
 Step 6. You will need your light green squares equivalent for the next steps. Place them knit side down, onto the blue squares. Sew up the indicated edges (turquoise outlines).
 Step 7. Done!
 Step 8. As the whole should look at this point…
 Step 9. Using the pic above as a guide, sew up the edges on the light green squares (indicated by a turquoise line), to the edges of the dark green rectangles (indicated by a pink line).

 Step 10. I have lifted up the light green squares, so you have a better view of the next steps. I have also pinned the dark green rectangles for the same reason, but you don’t need to do that…
You will need your orange rectangles equivalent for the next seam.
 Step 11. Sew the short sides of the orange rectangle to the free edges of the blue squares.
 Step 12. Repeat for the other side…
 Step 11. Sew the short sides of the orange rectangle to the free edges of the blue squares.
 Step 12. Repeat for the other side…
Well done! You are getting there slowly but surely… 🙂
If you have any questions about the tutorial, or if you feel I could explain things a little differently/more clearly, please leave a comment. I would appreciate it very much my friends… 🙂
On other things… this was a bit unexpected, loved this (what do you think?), and found this interesting…
Word of the Day
gallimaufry
a noun: meaning a hodgepodge, a jumble
Tomorrow, pics from the party…
I hope you all have a wonderful day…
Lots of Love,
Heidi 🙂
COMMENTS
MAKE A COMMENT