
Easy DIY Fringe Cardigan

Things You’ll Need
-
1 1/2 yards of knit fabric
-
Measuring tape
-
Sharp scissors
-
Pins
-
Wax paper
-
Tracing wheel
-
Sewing machine with a ball point needle
-
Rotary cutter and mat
-
Clear ruler

Step 1
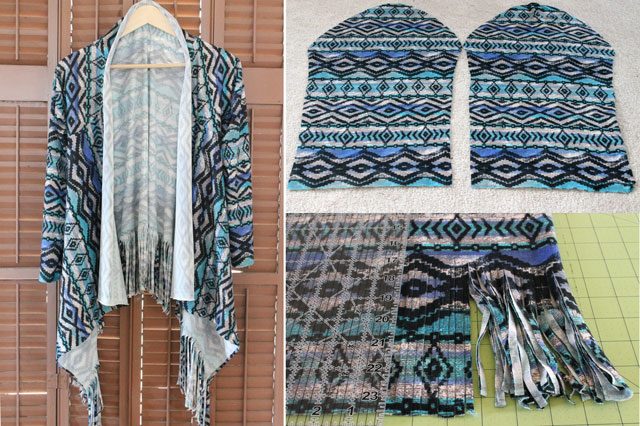
Cut a piece of knit fabric that is 50 by 36 inches. Hem one of the long sides and both of the short sides using one of the methods from this article: How to Hem Knit Fabrics.

Step 2
Fold the fabric in half so the two short sides are together. Draw a 7-by-5-inch oval pattern on wax paper and cut out. Place the pattern 3 inches from the top and 4 1/2 inches in from the fold. Pin the oval in place and use a sharp pair of scissors to cut around the oval to create the arm hole.

Step 3
Create a sleeve pattern from an existing sweater using the technique found in this article: How to Design Your Own Pattern. Just make sure that the length of the top of the sleeve is the same as the circumference of the armhole you cut. Use your pattern piece to cut out two sleeves.

Tip
- If you don’t want to create your own sleeve pattern, you could use one from another pattern you already have, but you might need to make a few adjustments along the top of the sleeve to make it fit into the armhole.
Step 4
Fold the sleeve in half so the right sides are together and pin in place.

Step 5
Use a zig zag stitch to sew along the pin line with a 1/2-inch seam allowance. Be sure to remove the pins as you sew.

Step 6
Turn the sleeve right-side out and slip it into the arm hole. Pin the upper edge of the sleeve in place with the right sides together, making sure the sleeve seam is at the bottom of the arm hole. Sew a 1/2-inch seam allowance using a zig zag stitch and make sure to remove the pins as you sew. Repeat this process with the other sleeve.

Step 7
Use a rotary cutter, cutting mat and clear ruler to cut 6-inch-by-1/4-inch fringe along the bottom of the cardigan. If you don’t have a rotary cutter and mat, you could use a sharp pair of scissors to cut the fringe.

Tip
- To save time when cutting the fringe, you can fold the fabric in half, then in half again, so you’re cutting several layers of fabric at a time.
And there you have it, a ridiculously easy-to-make fringe cardigan. Getting dressed will be a lot more fun when you have several of these hanging around in your closet.

Source : http://www.ehow.com/how_12343016_easy-diy-fringe-cardigan.html