

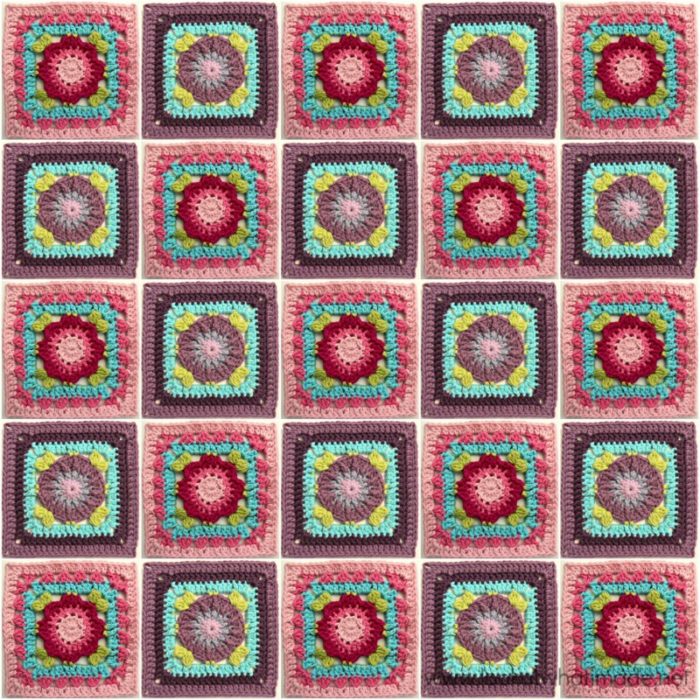
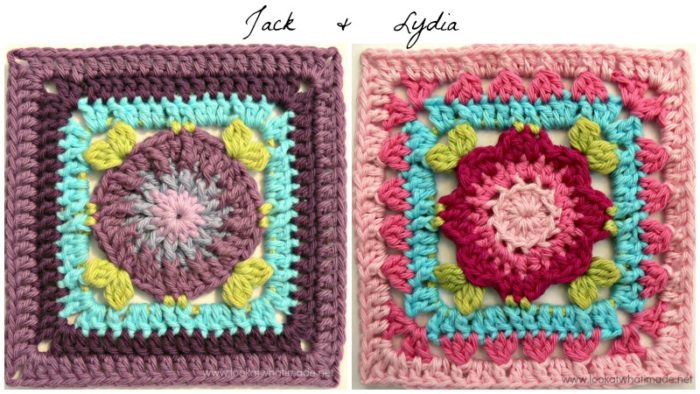
These 2 squares are part of a build-your-own-square idea I have been meaning to expand on for ages. I had hoped to be able to publish all the alternatives, but life (and Sophie) got in the way. So here, for your crocheting pleasure, are 2 of the possible variations: Jack and Lydia.
As most of you know, Sophie is named after Kimberly Slifer’s granddaughter. Said Sophie has 2 siblings, Jack and Lydia. And it just so happens that I have a Jack and a Lydia in my life too. Jack is my “work husband”, and has been for 10 years. Lydia was my best childhood friend.
Please Note that you do not HAVE to add these squares. They are optional. If you do not want to make them, head over to Part 20 to see if you would like to make the (optional) border.
If you are going to make these squares to extend your Sophie’s Universe, please read Part 19 before starting your squares.
Translations
- Dutch Translation by Dianne Baan
- German Translation by Maja Heidingsfelder
- Spanish Translation by Lynda Hernandez
- French Translation by Sandra Larvin
- Danish Translation by Tina Poulsen
- Russian Translations for Jack and Lydia by Natalie V. Alimpieva
- **Video Tutorial** by Esther Dijkstra from It’s All in a Nutshell.
These squares are made with Scheepjeswol Cotton 8 (4 ply/#2) and a 3.25 mm Clover Amour Crochet Hook (US D/3 UK 10). They are 10 cm (4″) big. Lydia takes about 20 meters of yarn. Jack is greedy and needs 22 meters.
If you would like to use these squares for a baby afghan, you can see some of the possible “configurations”HERE on Flickr.
Update: It appears that my last edit did not save properly. Please note the ammendments in Rounds 2 and 7 of Lydia, and in Round 7 of Jack. They are in red to make them easy to find.
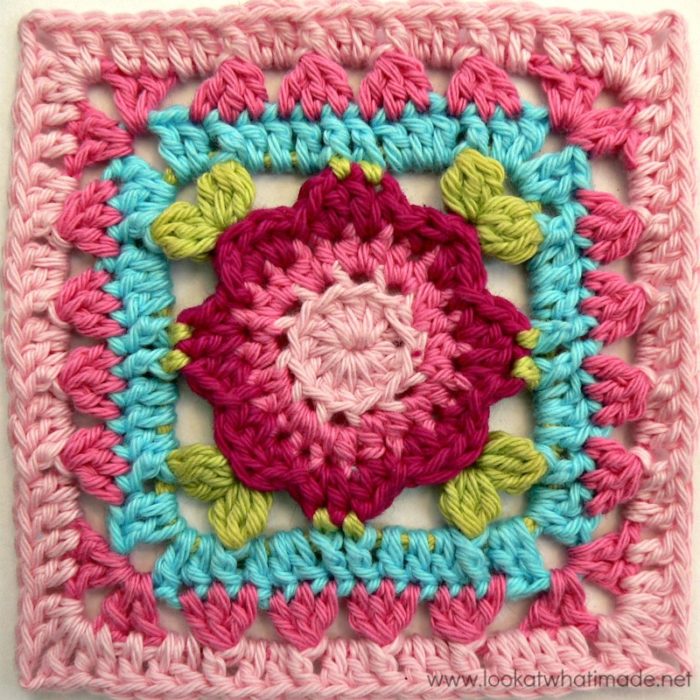
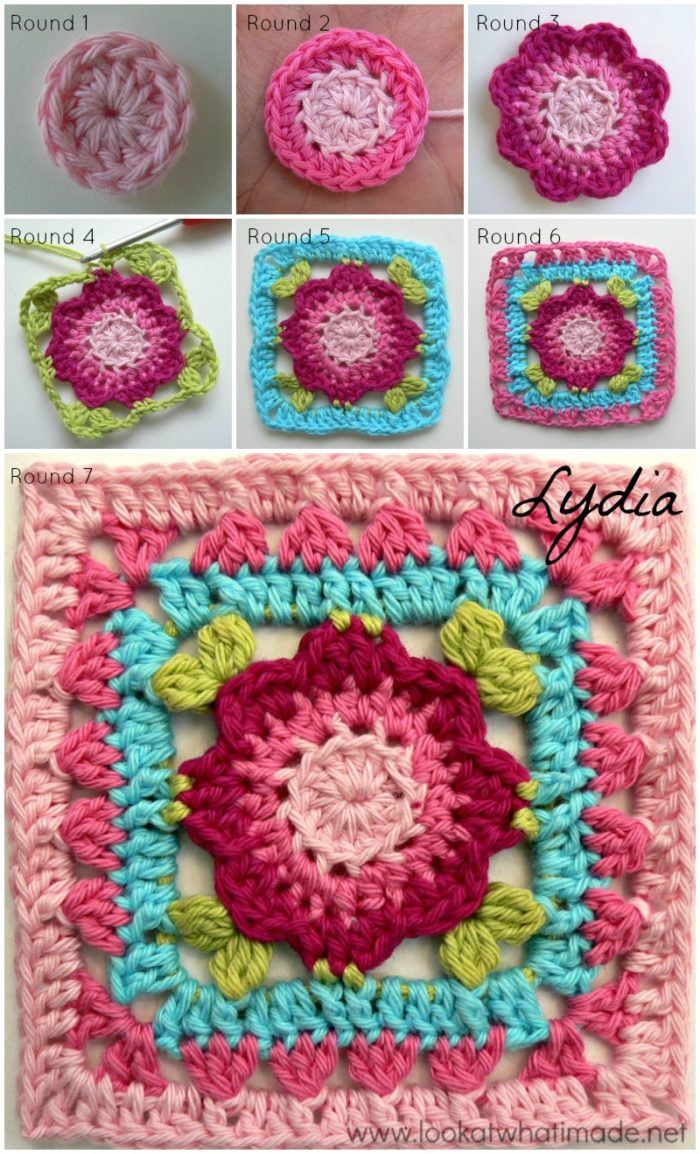
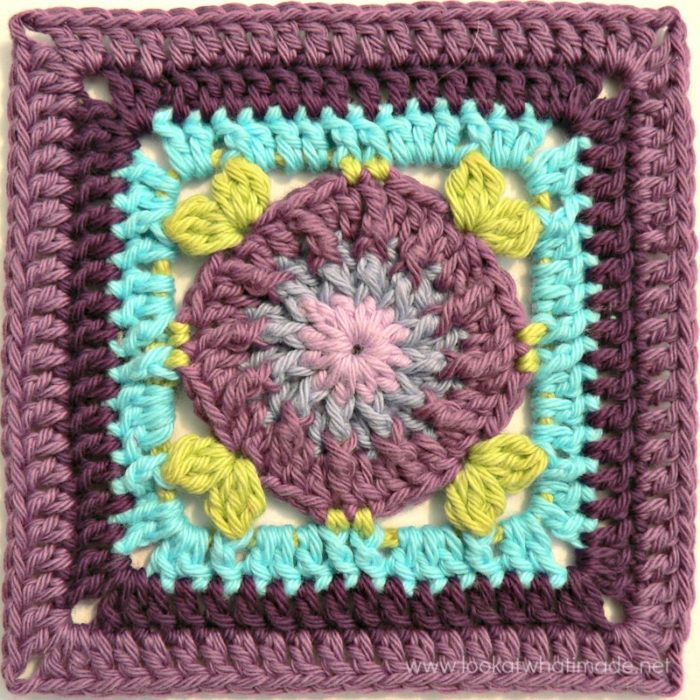
Lydia 4″ Crochet Square
©Dedri Uys 2015. All Rights Reserved.
Save for Later: Add this pattern to your Ravelry Queue
Colours: Light Pink, Dark Pink, Fuchsia, Light Green, and Light Turquoise.
Abbreviations
- BLO – Back loop only
- Ch – Chain
- Dc – Double crochet
- Fpdc – Front post double crochet
- Fptr – Front post treble crochet
- Hdc – Half-double crochet
- Sc – Single crochet
- Sl st – Slip stitch
- St/st’s – Stitch/stitches
- * – Repeat instructions between asterisks the amount of times specified. This is a hardcore repeat and will consist of multiple instructions.
- () – Repeat instructions between parentheses the amount of times specified. This is a lower level repeat.
Special Stitches
- Cluster : Dc3tog – see this tutorial.
- Bobble Stitch: Yarn over and insert your hook into the indicated stitch. Yarn over and pull up a loop. Yarn over and pull through 2 loops – 2 loops on your hook. Yarn over and insert your hook into the same stitch. Yarn over and pull up a loop – 4 loops on your hook. Yarn over and pull through 2 loops – 3 loops on your hook. Yarn over and insert your hook into the same stitch. Yarn over and pull up a loop – 5 loops on your hook. Yarn over and pull through 2 loops – 4 loops on your hook. Yarn over and pull through all 4 loops. See this tutorial.
Round 1
Into a magic ring: ch 3 (this counts as your first dc). Make 11 dc’s into the ring. Join to the top of the beginning ch-3 with a sl st. If you are going to change colours for the next round, consider using the invisible join instead.
If you are not familiar with working into a magic ring, this video tutorial by Tamara from Moogly is very good. Please remember, when working into a magic ring you HAVE to work away your initial tail very well. If you just cut it, your whole project might unravel!
Stitch count: 12 dc’s
Round 2
Join your new colour by making a standing half-double crochet in the blo of any stitch around. Make another hdc in the blo of the same stitch. Make 2 hdc’s in the blo of each of the remaining 11 st’s. Join to the standing half-double crochet with a sl st.
Stitch count: 24 hdc’s
Round 3
- If you are using the same colour, (hdc, dc) in the stitch after the sl st join. (Dc, hdc) in the next stitch.
- If you are using a new colour, join your yarn by making a sl st into the same st as the sl st join (Photo 1). (Hdc, dc) in the next stitch. (Dc, hdc) in the next stitch.
*Slip stitch in the next stitch. (Hdc, dc) in the next stitch. (Dc, hdc) in the next stitch.* Repeat from * to * 6 more times. Join by making a sl st in the same stitch as the initial sl st.
Fasten off and work away your tails of yarn.
Stitch count: 40 st’s – including sl st’s {16 dc’s, 16 hdc’s, and 8 sl st’s}
Round 4
In this round, you will be working into the “third loop”, which you will find immediately behind the back loop of your stitches. See THIS TUTORIAL by Moogly if you do not know how to identify the third loop.
Join your yarn by making a standing single crochet in the second dc of any petal.
*Ch 3. (Bobble Stitch, ch 4, Bobble Stitch) in the third loop of the second dc of the next petal. This is your corner made. Ch 3. Sc in both dc’s of the next petal.*
Repeat from * to * 3 more times, omitting the last sc on the last repeat. Join to the top of the first sc with a sl st.
Fasten off. Leave your tails until you have made the next round as it will be easier to work them away then.
Stitch counts:
- Total: 16 st’s, 8 ch-3 spaces and 4 ch-4 corner spaces {8 Bobble Stitches and 8 sc’s}
- Per Side: 4 st’s and 2 ch-3 spaces {2 Bobble Stitches and 2 sc’s}
Round 5
Join your new yarn by making a standing double crochet in any ch-4 corner space. (Dc, ch 2, 2 dc) in the same ch-4 corner space. This is your corner made.
*Make a fpdc around the next Bobble Stitch. Make 3 dc’s in the next ch-3 space. Make a fpdc around the next 2 sc’s. Make 3 dc’s in the next ch-3 space. Make a fpdc around the next Bobble Stitch. (2 dc, ch 2, 2 dc) in the next ch-4 space.*
Repeat from * to * 3 more times, omitting the last corner on the last repeat. Join to the top of the beginning ch-3 (or the standing double crochet) with a sl st.
Stitch counts:
- Total: 56 st’s and 4 ch-2 corner spaces {40 dc’s and 16 fpdc’s}
- Per Side: 14 st’s {10 dc’s and 4 fpdc’s}
Round 6
- If you are using the same colour, sl st into the next dc and into the ch-2 corner space. Ch 3 (this counts as your first dc). (Dc, ch 2, 2 dc) in the same ch-2 space. This is your first corner made.
- If you are using a new colour, join your yarn by making a standing double crochet in any ch-2 corner around. (Dc, ch 2, 2 dc) in the same ch-2 corner space. This is your corner made.
* Ch 2. Skip the first (hidden) stitch. (Make a Cluster, ch 2) 4 times. Skip the last stitch. (2 dc, ch 2, 2 dc) in the next ch-2 space.*
Repeat from * to * 3 more times, omitting the last corner on the last repeat. Join to the top of the beginning ch-3 (or the standing double crochet) with a sl st.
Stitch counts:
- Total: 32 st’s, 24 ch-2 spaces including ch-2 corner spaces {16 dc’s and 16 Clusters}
- Per Side: 8 st’s and 5 ch-2 spaces {4 dc’s and 4 Clusters}
Round 7
- If you are using the same colour, sl st into the next dc and into the ch-2 corner space. Ch 3 (this counts as your first dc). (Dc, ch 2, 2 dc) in the same ch-2 space. This is your first corner made.
- If you are using a new colour, join your yarn by making a standing double crochet in any ch-2 corner space. (Dc, ch 2, 2 dc) in the same ch-2 corner space. This is your corner made.
*Dc in the first 2 st’s. (Make 2 dc’s in the next ch-2 space, make a fpdc around the next cluster) 4 times. Make 2 dc’s in the last ch-2 space. Dc in the last 2 st’s. (2 dc, ch 2, 2 dc) in the next ch-2 space.*
Repeat from * to * 3 more times, omitting the last corner on the last repeat. Join to the top of the beginning ch-3 (or the standing double crochet) with a sl st.
Stitch counts:
- Total: 88 st’s and 4 ch-2 corner spaces {72 dc’s and 16 fpdc’s}
- Per Side: 22 st’s {18 dc’s and 4 fpdc’s}
Jack 4″ Crochet Square
©Dedri Uys 2015. All Rights Reserved.
Save for Later: Add this pattern to your Ravelry Queue
Colours: Violet, Light Purple, Moors, Heath, Light Green, and Light Turquoise.
Abbreviations
- BLO – Back loop only
- Ch – Chain
- Dc – Double crochet
- Fpdc – Front post double crochet
- Fptr – Front post treble crochet
- Sc – Single crochet
- Sl st – Slip stitch
- St/st’s – Stitch/stitches
- * – Repeat instructions between asterisks the amount of times specified. This is a hardcore repeat and will consist of multiple instructions.
- () – Repeat instructions between parentheses the amount of times specified. This is a lower level repeat.
Special Stitches
- Bobble Stitch: Yarn over and insert your hook into the indicated stitch. Yarn over and pull up a loop. Yarn over and pull through 2 loops – 2 loops on your hook. Yarn over and insert your hook into the same stitch. Yarn over and pull up a loop – 4 loops on your hook. Yarn over and pull through 2 loops – 3 loops on your hook. Yarn over and insert your hook into the same stitch. Yarn over and pull up a loop – 5 loops on your hook. Yarn over and pull through 2 loops – 4 loops on your hook. Yarn over and pull through all 4 loops. See this tutorial
Round 1
Into a magic ring: ch 3 (this counts as your first dc). Make 11 dc’s into the ring. Join to the top of the beginning ch-3 with a sl st. If you are going to change colours for the next round, consider using the invisible join instead.
If you are not familiar with working into a magic ring, this video tutorial by Tamara from Moogly is very good. Please remember, when working into a magic ring you HAVE to work away your initial tail very well. If you just cut it, your whole project might unravel!
Stitch count: 12 dc’s
Round 2
If you have any problems with this round, have a look at THIS TUTORIAL, which focusses on increasing with front post stitches.
- If you are using the same colour, ch 3 (this counts as your first dc) and make a fpdc around the beginning ch-3 of the previous round, which counts as the “post” of your first dc.
- If you are using a new colour, join your yarn by making a standing double crochet in the same st as the sl st join and then make a fpdc around the beginning ch-3 of the previous round, which counts as the “post” of your first dc.
(Dc in the next dc. Make a fpdc around the post of the same stitch) in every stitch around. Join to the top of the beginning ch-3 (or the standing double crochet) with a sl st.
Stitch count: 24 st’s {12 dc’s and 12 fpdc’s}
Round 3
- If you are using the same colour, ch 3 (this counts as your first dc).
- If you are using a new colour, join your yarn by making a standing double crochet in the same st as the sl st join.
Dc in the next st, which will be the fpdc from the previous round. Make a fptr around the post of the same stitch.
*Dc in the next 2 st’s, the second of which will be the fpdc from the previous round. Make a fptr around the post of the same stitch.*
Repeat from * to * 10 more times. Join to the top of the beginning ch-3 (or the standing double crochet) with a sl st.
Stitch count: 36 st’s {24 dc’s and 12 fptr’s}
Round 4
- If you are using the same colour, ch 1 and make a sc in the same stitch as the sl st join.
- If you are using a new colour, join your yarn by making a standing single crochet in the same st as the sl st join.
*Ch 3. Skip the next 3 st’s. (Bobble Stitch, ch 4, Bobble Stitch) in the next stitch, which should be dc before the next fptr. This is your corner made. Ch 3 and skip the next 3 st’s. Make sure that you skip only 3 st’s as the first stitch will be hidden by the Bobbles. Sc in the next 2 st’s, which will be a fptr and a dc.*
Repeat from * to * 3 more times, omitting the last sc on the last repeat. Join to the top of the first sc with a sl st.
Fasten off. Leave your tails until you have made the next round as it will be easier to work them away then.
Stitch counts:
- Total: 16 st’s, 8 ch-3 spaces and 4 ch-4 corner spaces {8 Bobble Stitches and 8 sc’s}
- Per Side: 4 st’s and 2 ch-3 spaces {2 Bobble Stitches and 2 sc’s}
Round 5
Join your new yarn by making a standing double crochet in any ch-4 corner space. (Dc, ch 2, 2 dc) in the same ch-4 corner space. This is your corner made.
*Make a fpdc around the next Bobble Stitch. Make 3 dc’s in the next ch-3 space. Make a fpdc around the next 2 sc’s. Make 3 dc’s in the next ch-3 space. Make a fpdc around the next Bobble Stitch. (2 dc, ch 2, 2 dc) in the next ch-4 space.*
Repeat from * to * 3 more times, omitting the last corner on the last repeat. Join to the top of the beginning ch-3 (or the standing double crochet) with a sl st.
Stitch counts:
- Total: 56 st’s and 4 ch-2 corner spaces {40 dc’s and 16 fpdc’s}
- Per Side: 14 st’s {10 dc’s and 4 fpdc’s}
Round 6
- If you are using the same colour, sl st into the next dc and into the ch-2 corner space. Ch 3 (this counts as your first dc). (Dc, ch 2, 2 dc) in the same ch-2 space. This is your first corner made.
- If you are using a new colour, join your yarn by making a standing double crochet in any ch-2 corner space. (Dc, ch 2, 2 dc) in the same ch-2 corner space. This is your corner made.
*Make a dc in each of the 14 st’s across. (2 dc, ch 2, 2 dc) in the next ch-2 space.*
Repeat from * to * 3 more times, omitting the last corner on the last repeat. Join to the top of the beginning ch-3 (or the standing double crochet) with a sl st.
Stitch counts:
- Total: 72 dc’s and 4 ch-2 corner spaces
- Per Side: 18 dc’s
Round 7
- If you are using the same colour, sl st into the next dc and into the ch-2 corner space. Ch 3 (this counts as your first dc). (Dc, ch 2, 2 dc) in the same ch-2 space. This is your first corner made.
- If you are using a new colour, join your yarn by making a standing double crochet in any ch-2 corner space. (Dc, ch 2, 2 dc) in the same ch-2 corner space. This is your corner made.
*Make a dc in each of the 18 st’s across. (2 dc, ch 2, 2 dc) in the next ch-2 space.*
Repeat from * to * 3 more times, omitting the last corner on the last repeat. Join to the top of the beginning ch-3 (or the standing double crochet) with a sl st.
Stitch counts:
- Total: 88 dc’s and 4 ch-2 corner spaces
- Per Side: 22 dc’s

Reme